
Tuesday, 31 May 2011
random ( texture library)
website : http://www.creativecrash.com/maya/downloads/shaders/c/
 i found this in the website while searching for texture tutorial. this is a texture library found on the net, compare to another few that i found , i find that this is much better as other texture library contain virus or scam . i hope that this library is useful in the near future when i need extra texture
random stuff( toon shading, part 2)
website : http://www.dl3d.com/index.php/en/tutorials/tutorial-cartoon-shader-contourshader-maya-mentalray.html
after compare and contrast a few website on maya tutorial on toon shading , i found that this website is quite good and it look professional , however when i was doing half way i found out that some of the item is not found in my maya program. after checking it with my tutor, i found out that texture DL_3d toonshaded is not included in my maya, i think it is a plug in tool.it is needed to download then can be used.
after compare and contrast a few website on maya tutorial on toon shading , i found that this website is quite good and it look professional , however when i was doing half way i found out that some of the item is not found in my maya program. after checking it with my tutor, i found out that texture DL_3d toonshaded is not included in my maya, i think it is a plug in tool.it is needed to download then can be used.
random stuff( toon shading)
this is what i found on the web, i was curious about toon shading and decided to look for info about it.
i try to follow the instruction of the website. firstly i needed to make it like a chrome ball, example.make diffuse , specular colour and reflectivity to zero, and allow ambient colour to full. it is similar to the chrome ball exercise ,


Saturday, 28 May 2011
random stuff( Facing Ratio shader node in Maya)
website : http://www.stevenchan.us/facing_ratio_shader_node_in_maya
this is something i found on the net that is related to the chrome exercise and node.it has something interesting point that i like , for example in the first section , it talk about ratio of the light and how effective light is being bound back at the camera

i felt that this is important as when i do my double cheese burger, one of the main problem i encounter is that the amount of light effective bounce off my burger. even consult my tutor, and try my tutor method by adding a point light. the result is not quite what i want. i want my double cheese burger at some point maybe at the top of the upper bun to have more reflect light than the bottom of the upper bun. something like a chrome ball, the shading of colour , but this time a shading in light.
another thing that i like is the toon shading , compare to x-ray and velvet, I find that toon shading is more comfortable and i think it will be much easier for me as a beginner to start off with. it is similar to chrome ball and it is like an extension to it, i hope i have some time and try to do the toon shading when i free
 all of the image above is taken from http://www.stevenchan.us/facing_ratio_shader_node_in_maya
this is something i found on the net that is related to the chrome exercise and node.it has something interesting point that i like , for example in the first section , it talk about ratio of the light and how effective light is being bound back at the camera

i felt that this is important as when i do my double cheese burger, one of the main problem i encounter is that the amount of light effective bounce off my burger. even consult my tutor, and try my tutor method by adding a point light. the result is not quite what i want. i want my double cheese burger at some point maybe at the top of the upper bun to have more reflect light than the bottom of the upper bun. something like a chrome ball, the shading of colour , but this time a shading in light.
another thing that i like is the toon shading , compare to x-ray and velvet, I find that toon shading is more comfortable and i think it will be much easier for me as a beginner to start off with. it is similar to chrome ball and it is like an extension to it, i hope i have some time and try to do the toon shading when i free

week5_02_part2_Chrome ball

Wednesday, 25 May 2011
week5_02_part1_Dice


overall , this exercise is quite fun and simple , it is quite easy and the node is easy to understand. however when i try to do complex shape like cylinder or bevel cube it is hard as the shape is not even . it require more skill, also i try to play with the different function, like transparent, diffuse and many more.
IN3D random stuff( Mc Cafe coffee)
this is something that i created, this object proved to be very challenging as it require a lot of parts and require a lot of bevel and boolean tool .the most difficult part is the hole in the coffee lib.
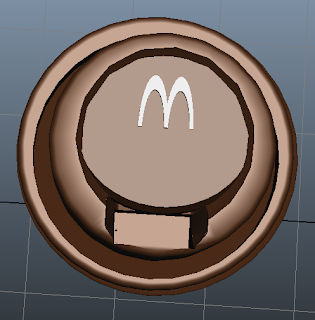

 to create the object first i create a cylinder and change into vertex mode and scale the lower part of the cyclinder to make it much smaller , then i added another cylinder on top of it, after that i added another cylinder as a additional feature .
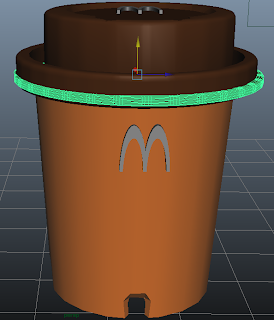


after that i create another cylinder and use boolean-difference to remove the interior part of the lib.
after that i create another cylinder and apply the same thing i did to the lib.

after creating it , i create a cube and bevel it to .6 and fit it inside the cylinder and use boolean -difference to make a hole inside.

after that, i create a flat cylinder and place it on the lib, this will allow the shape to be more smooth and more real, after that i create a text word "M" by creating a pipe and compress it , the cut it to half and paste the both part side by side and use combine.

the base of the cup i have use a sphere and compress it then use oolen-different to make a empty spacing inside the cup. and use a bevel cube and place it at the four side, then use boolean difference to make four hole.

the colour that i choose is pong as the cup and lib is made out of plastic, i felt that pong will be the best material to use it
in this exercise , i find that logical thinking is needed to created a object, whenever i stuck , or i don't know how to create a shape , i need to break down to shape or replace the shape with something else and try to create the object in my head . it also need to keep on practise and learn different function maya have, the more function i learn , the better it help me in my exercise.
Tuesday, 24 May 2011
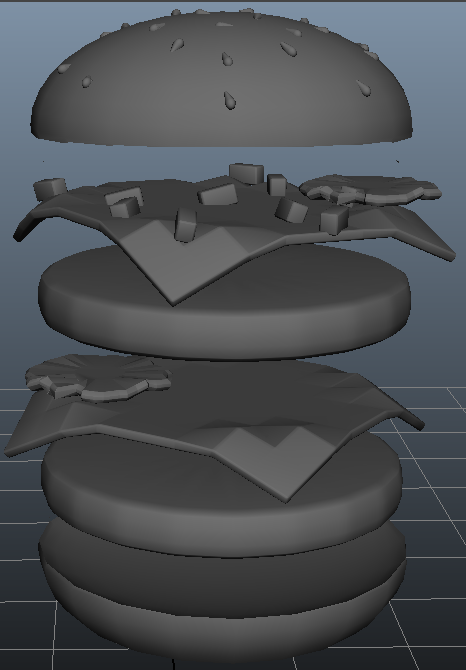
IN3D project 1 ( Double cheese burger)( part 3) the process of making double cheese burger
In order to make the double cheese burger below . i needed to first split the the burger to 4 part, the upper bun ,the cheese, meat and the lower bun. then additional feature like onion, prickles and sesame seed.


The Bun - in order to make the bun , i need to create a sphere then scale it by compress the height

then added a sphere below it and use boolean - difference to remove the lower part of the bun.

then added another sphere below the bun object to make the base more broad . this will enable the upper curve to be more smooth, the reason to add this step is because i found that a bun does not have a curve inward of the bun .this step is to add realistic into the bun .

after doing the bun, now is added sesame seed into the bun, after carefully observation, and multiple failure , i found out that it is hard to do the sesame seed in one shape. therefore i have add a sphere and a cone together and scale it by compress it. then i bevel it to remove the sharp point of the cone .

after that i create multiple object and added it to the bun. when doing it this i have to keep on changing view, such as front view, side view and keep on rotate the seeds to make the seed soak into the bun evenly and the seeds is facing different direction, this will allow the seed to look randomly put onto the bun. then combine the object

after making the bun - i went on to make the onion, i have decided to use bevel rectangle as the shape of the onions. the reason is because only a few selected onion will be shown the the edge of the bun and it will mostly covered by the bun, therefore it is not require to make the exact shape .by making a bevel rectangle it is more thicker and at the side view , the onion will be clearly shown

The Cheese- the cheese that the double cheese burger is slightly bend at the edge. it is to make it look like the cheese is melted and stick on the meat. therefore in order to make the bend effect at the end of the cheese. i needed to use a cube and compress it and then sub divide it width and depth to 8 . then change to face mode and select the face at the edge of the square. after selecting it .
 After selecting the face, rotate it by rotating it left-down then rotate it right down to make it bend down, after than select the move tool and move the selected face down. this is needed to level the bump on the other face . to remove the bumps on the cheese. if this step is not done, when u bevel the cheese, the bump will be more obvious .
 after doing the side and bevel it, in order to make it more smooth , i need more polygon , therefore i make use of the smooth function and added more polygon. when doing this i need to be careful as too much polygon will increase the memory needed .

 Meat- the meat is being done by making cylinder and scale it by compress it. after making it,the next step i need to to add bevel into it. this is quite hard as different amount of bevel will give different result, too much bevel, another thing i found out is that too much bevel will cause the program to lag eg. bevel=1 will cause to program to hang even though the object is very smooth. too little bevel will make the side of the object too square. i needed to try and error a few time to get the right amount.
 The prickles- to do the prickles, i create the cylinder and compress it . then i change to vertex mode and select the point at the edge of the cylinder.
 then i use the move tool and select the point and random move it to give it a irregular shape . after making it, i bevel it to 0.4 so that the shape edge can be smoothed.


 The lower bun - in order to create this shape, i use the upper bun, and added a cube on the top of the bun , then i use boolean- difference to remove the curve


End product -
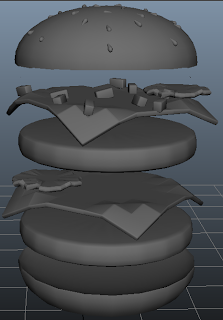 Colour- in order to create the colour i decide to use Lambert as the bun does not reflect a lot of light ,it more of like the light bounce in different angle . the bun i use brown-orange , the cheese i use yellow,the prickle i use green , and the meat i use-brownish-black


Monday, 23 May 2011
IN3D project 1 ( Double cheese burger)( part 2)


this is the first attempt i try when doing the double cheese burger, it took me 2 hour to complete it . it was quite hard to made the double cheese burger as it require alot of time and logic thinking. it need lots of logic thinking on how different shape can be model together as one. i think the hardest of all is the cheese as it require a lot of logic thinking and times.the colour i use is lambet and it quite challenging as the real object require a lot of different shading of colour . i needed to look deeply at the real object and figure how to added colour scheme into it.
this is done on week 5 (24/5/2011) i will try to ask my tutor for advice on how to improve the object further or colour .
Subscribe to:
Comments (Atom)